Uploading Sensor Data Into Production Database Using the Sensor GUI
A Graphical User Interface (GUI) script has been written for easily uploading test sensor data of a registered component into the production database (PDB).
Make sure to upload first the CV data in order to obtain the full depletion voltage before uploading the IV data.
Uploading test data GUI tutorial
(i) Starting the GUI
To start the GUI for uploading test data simply cd into sensors_production/GUI and run UploadTestResult.py:
1 2 | |
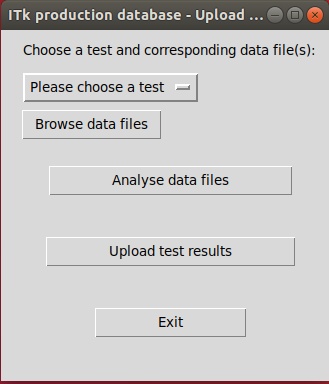
You should see the GUI popping up on your screen and it should look like this:
(ii) Data input Description
Before you can use to GUI to select, analyse and upload your sensor data, you must make sure that data is in the correct format.
Your data can be a json-file or a text file. Example data for all tests can be found here:
1 | |
Make sure to change your data to have the same input as the example files or simply overwrite the example files. Save all your data in the /data folder.
Example of an IV-test json-file:
1 2 3 4 5 6 7 8 9 10 11 12 13 14 15 16 17 18 19 20 | |
Data input for all tests
| Input | Description | Required |
|---|---|---|
| Component | Database serial number of the component to upload data to. | Yes |
| Test | Specify the test name: IV, CV, IT, inter-pixel resistance, metrology on wafer/sensor or visual inspection. | Yes |
| Institution | Code of institute taking the test | Yes |
| Data | Data and time the test was done | Yes |
Data input for IV, CV and IT Test
| Input | Description | Required |
|---|---|---|
| Prefix | Prefix (Unit) of number on current (A or uA ) or capacitance (F or pF) | No[^1] |
| Depletion Voltage | Depletion Voltage on sensor in units of Volts (V) | Yes |
| Hum | Average humidity during test measurements in RH (%) | No[^2] |
| Temp | Average temperature during test measurements in ℃ | No[^2] |
| Time | Time data array in seconds (s) | only for IT |
| Voltage | Voltage data array in (V) | Yes |
| Current/Capacitance | Data array for current or capacitance in units specified in Prefix | Yes |
| Sigma current/capacitance | Uncertainty array on current/capacitance in the same unit | No |
| Temperature | Temperature array data during measurements in ℃ | No[^2] |
| Humidity | Humidity array data during measurements in RH (%) | No[^2] |
[^1] If nothing entered, the default units will be assumed (uA and pF).
[^2] At least either the average temperature and humidity must be present OR the temperature/humidity array must be present (the average is a requirement in the QC specifications and gets calculated if only the array is filled in).
Data input for Inter-pixel resistance
| Input | Description | Required |
|---|---|---|
| Resistance | Resistance measured in Ohm (Ω) with any prefix | Yes |
| Capacitance | Capacitance measured Farad (F) with any prefix | Yes |
Data input for Metrology
| Input | Description | Required |
|---|---|---|
| Sensor Bow | 3x3 matrix array with bow measurement | Only for sensor tile |
| Sensor/wafer thickness | Thickness of sensor/wafer | Yes |
Data input for Visual Inspection
| Input | Description | Required |
|---|---|---|
| Comment | String describing the visual inspection | Yes |
| Test_passed | Boolean (true or false) stating if the test passed or not | Yes |
| Image_link | Weblink to the storage of the high-resolution images | Yes |
(iii) Analysing and uploading data
When the data input is ready, you can analyse it and then upload the data to the component specified in the json-data file.
In GUI, select your test you want to upload with "Please choose a test" drop-down menu and select the data input file with the "Browse data files".
After this selection, click the "Analyse data files" button in the GUI. Your data will now get analysed by the scripts and the output in the terminal should look something like this (example of CV-test output):
1 2 3 4 5 6 | |
The output in the terminal will tell you which criteria in the test passed or failed. For IV, CV or IT-test, plots will get created in the /plots folder.
To upload the analysed test, click "Upload Test Results". A green success message will show in the GUI if the data was uploaded and you can view your test data in the WebApp under "My Components" -> Select Component -> Scroll all the way down to see "Tests".
If the analysis/upload fails, please see error output in the terminal window or see section (IV)
Tip
If you have many data files, you can select them one by one in the GUI and they will get stored in a data array and can be analysed and uploaded at the same time.
(IV) Checking your data input
Checking IV, CV, IT data:
- In the IV, CV and IT JSON-file check that your data array is named
IV_ARRAY,CV_ARRAYandIT_ARRAYrespectively in the JSON-file. - Make sure the data array lengths are equal for all the input. For example, you can't have 4 voltage steps and 5 current steps in your arrays.
- Make sure there are commas and end brackets correctly set in your data-input
All tests:
You can always modify/debug the analysis scripts by going into the Analysis folder.
For bugs/feedback found in the GUI scripts, please make a git issue.